To show the fields only in the Edit mode of the page, add the controls in the following node by editing the page layout of the page.
PublishingWebControls:EditModePanel control is used to show the controls only in the edit mode of the page.
The way we do this is by putting two edit mode panels on the page layout, one configured to render in edit mode, and another configured to render in view mode:
To show in view mode
<
PublishingWebControls:EditModePanel runat=server id="EditModePanelA" PageDisplayMode="Display">
<
SharePointWebControls:FieldValue runat="server" id="ImageFieldValue" FieldName="PublishingPageImage"/>
PublishingWebControls:EditModePanel>
To show in Edit mode only
<
PublishingWebControls:EditModePanel runat=server id="EditModePanelB">
<
SharePointWebControls:FieldValue id="ContactEMailId" FieldName="ContactEMail" runat="server" />
PublishingWebControls:EditModePanel>
The first one will render its contents when people are viewing the page, while the second one will render when people are editing the page
Thursday, March 19, 2009
Creating MenuItem in the site Actions menu and adding Security
The application pages and supporting menu items in the Site Actions menu shown so far have been created in a manner so that they are accessible to all users of a site. However, that isn't always desirable. Application pages are often designed to provide information and functionality that should only be accessible to site administrators. The same shows to create a menu item in the Site Actions menu.
This can be installed to sharePoint as a feature as mentioned in the XML below. You can add an attribute named RequireSiteAdministrator and assign it a value of true so that the menu item only displays to those users who are also site administrators.
< CustomAction Id="SiteActionsToolbar" GroupId="SiteActions" Location="Microsoft.SharePoint.StandardMenu" Sequence="1003" Title="Application Page 3" Description="Check out some typical site properties" RequireSiteAdministrator="True" ImageUrl="/_layouts/images/DECISION.GIF">
< UrlAction url="~site/_layouts/CustomApplicationPages/ApplicationPage3.aspx">
< /CustomAction>
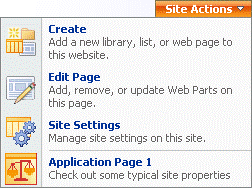
After Installing the feature, the SharePoint site looks like
.gif)
This can be installed to sharePoint as a feature as mentioned in the XML below. You can add an attribute named RequireSiteAdministrator and assign it a value of true so that the menu item only displays to those users who are also site administrators.
< CustomAction Id="SiteActionsToolbar" GroupId="SiteActions" Location="Microsoft.SharePoint.StandardMenu" Sequence="1003" Title="Application Page 3" Description="Check out some typical site properties" RequireSiteAdministrator="True" ImageUrl="/_layouts/images/DECISION.GIF">
< UrlAction url="~site/_layouts/CustomApplicationPages/ApplicationPage3.aspx">
< /CustomAction>
After Installing the feature, the SharePoint site looks like
.gif)
Activating Auditing Programmatically for a Document Library in SharePoint
In the SharePoint (MOSS) object model, SPList objects and SPListItem objects expose an Audit property that makes it possible to configure auditing. The following example shows how to enable auditing in a single document library.
// Open site and Web objects
SPSite siteCollection = new SPSite(http://localhost);
SPWeb site = site.OpenWeb("testweb");
// Open the document library to enable auditing
SPList docLib = site.Lists("documents");
// Turn on auditing flags.
docLib.Audit.AuditFlags = SPAuditMaskType.View
SPAuditMaskType.ChildDelete;
docLib.Audit.Update();
To enable auditing at site collection level
// Open site object
SPSite siteCollection = new SPSite(http://localhost/);
// Enable auditing for the site
siteCollection.Audit.AuditFlags = SPAuditMaskType.All;
siteCollection.Audit.Update();
Wednesday, March 18, 2009
Configuring User Profiles in Sharepoint from Active directory
User profile is configured through SharePoint Shared Service provider (SSP).
The below steps describes the configuration of user profiles from Active directory
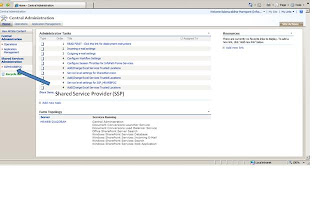
1. Create a SSP using Central Administration of sharepoint, if not available already.
2. Access SSP for sharepoint server from Central Administration

3. Access user profiles and properties from the Next screen

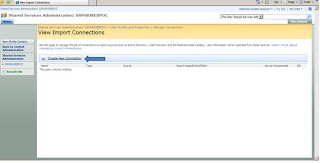
4. Click ‘View Import Connections’ from below screen

5. Choose ‘Create Connection’ to create a master connection to Active Directory

6. Enter type as Active Directoty and Enter Domain name and click ‘Auto Fill Root Search Base button’ from next screen
7. Make sure that the ‘Authentication Information’ has ‘Default Account’ selected
8. If the application requires incrmental import, then make sure that the ‘Enable server Side Incremental’ is checked to support incremental imports.
9. Then create the connection.
10. Once the connection is created from active directory, start full import using the below screen

The below steps describes the configuration of user profiles from Active directory
1. Create a SSP using Central Administration of sharepoint, if not available already.
2. Access SSP for sharepoint server from Central Administration

3. Access user profiles and properties from the Next screen

4. Click ‘View Import Connections’ from below screen

5. Choose ‘Create Connection’ to create a master connection to Active Directory

6. Enter type as Active Directoty and Enter Domain name and click ‘Auto Fill Root Search Base button’ from next screen
7. Make sure that the ‘Authentication Information’ has ‘Default Account’ selected
8. If the application requires incrmental import, then make sure that the ‘Enable server Side Incremental’ is checked to support incremental imports.
9. Then create the connection.
10. Once the connection is created from active directory, start full import using the below screen

Tuesday, March 17, 2009
Reading User Profiles from SharePoint(MOSS) programatically
User profile for SharePoint can be imported from Active directory(using master connection from current domain) and SQL server using Business data catalog(BDC) using an application definition file. Audiences can be created from the user profile information based on some rules.
To read the user profile information, we need the following namespaces.
using Microsoft.Office.Server.UserProfiles;
using Microsoft.Office.Server;
using Microsoft.SharePoint;
// GET THE current web
SPWeb web = SPContext.Current.Web;
// Get the logged in user
SPUser user = web.CurrentUser;
// Get the user context
ServerContext ctx = ServerContext.GetContext(HttpContext.Current);
// Get the user profile associated with the context
UserProfileManager userprofilemgr = new UserProfileManager(ctx);
// Get the user profile based on logged in User
UserProfile userprofile = userprofilemgr.GetUserProfile(user.LoginName);
// Reading User profile Information such as name, designation etc
string name = userprofile["First Name"];
userprofilemgr.GetUserProfile method in above code fails if the user does not have access to manage Audience. The permission to access the User profile is given by the following steps.
1. Open the SharePoint 3.0 Central Administration
2. Click on the Shared Services Provider (Farm SSP in this build) i.e. SSP linked to the current site.
3. Click on ‘Personalization services permissions’ under ‘User Profiles and My Sites’
4. Select the user ‘NT AUTHORITY\Authenticated Users’ and click on ‘Modify Permissions of Selected Users’
5. Select ‘Manage audiences’ and click on ‘Save’
6. ‘Manage Audiences’ right will be added to ‘NT AUTHORITY\Authenticated Users’
Running SharePoint custom code with elevated/ administrative privileges
Whenever writing a custom code(workflow / web parts / event handlers) for MOSS site, we sometimes require administrative previleges to run the custom code.
using Microsoft.SharePoint;
SPSecurity.RunWithElevatedPrivileges(delegate()
{
// Code to Run with admin privileges
});
This will take care of running the code with Administrative privileges. (Administrative account) even the user does not have access to the site.
To access the document in a SharePoint (MOSS) library programmatically
To access the document in a library, we need to do the following steps
1. First we need to create SPSite object for the site collection (E.g http://localhost)
2. Then we need to create SPWeb object inside the site collection (E.g http://localhost/testweb)
3. Get get the file by passing the relative url of the web (E.g /documents/samplefile.doc)
4. After getting the SPFile object, one can access the properties of the file as well as version.
Sample Code
using Microsoft.SharePoint;
SPSite site = new SPSite(http://localhost);
SPWeb spweb = site.OpenWeb("testweb");
SPFile file = spweb.GetFile("/documents/samplefile.doc");
Console.WriteLine(file.Url + ", " + file.Length);
SPFileVersionCollection versions = file.Versions;
Console.WriteLine(versions.Count);
for (int i = 1; i < versions.Count; i++)
{
SPFileVersion ver = versions[i];
Console.WriteLine(ver.VersionLabel + ", " + ver.Size);
}
Monday, March 16, 2009
Caching the first load times in SharePoint (Improving the performance of MOSS site at first load)
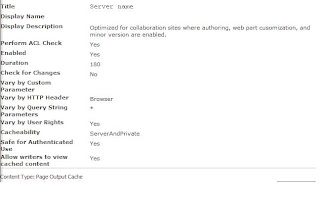
Generally the first time page load takes a huge time after doing IISReset. But by doing the below settings, the performance on first load will be faster.
To improve the performance of the SharePoint pages after we do an IISReset.
· Object cache size: 350 (http://servername/_Layouts/objectcachesettings.aspx)
· Site Collection Output Cache: enabled w/ modified Intranet profile:

Click on the image for better resoultion
To improve the performance of the SharePoint pages after we do an IISReset.
· Object cache size: 350 (http://servername/_Layouts/objectcachesettings.aspx)
· Site Collection Output Cache: enabled w/ modified Intranet profile:

Click on the image for better resoultion
Showing the page fields/Controls only in edit mode of the page
To show the fields only in the Edit mode of the page, add the controls in the following node by editing the page layout using SharePoint designer
layoutPublishingWebControls:EditModePanel
layoutPublishingWebControls:EditModePanel
Integrating InfoPath with Sharepoint List
Microsoft InfoPath supports multiple views of the same form.Based on business requirements and user roles, different views of the form can be shown to different users. The below steps is to integrate Infopath forms with Sharepoint Server
- Create the Sharepoint List
- Create the CAML fragment to serve as the base schema to submit to the webservice
- Create the form template and add the data connections
- Identify the GUID used as the ID for the List
- Add controls to the form template to display the current items in the list
- Add fields and controls for entering new items to submit to the list
- Add a connection to the sharepoint Lists webservice and define the parameters for calling UpdateListItems web method
- Add the event handler code required to submit additions, updates and deletions from the list
- Test the form and publish to Sharepoint Server To a Form Library or As a site content type
Building Windows SharePoint Services Search Queries
Search in Windows SharePoint Services supports three types of search syntax for building search queries:
· Keyword Query syntax (search terms are passed directly to the Search service)
· SQL syntax (extension of SQL syntax for querying databases)
· URL syntax (search parameters are encoded in URL, and posted directly to the search page)
Keyword Query syntax
You can pass two types of terms in a Windows SharePoint Services Search keyword query:
· Keywords (the actual query words for the search request)
· Property filters (the property constraints for the search request)
e.g Keyword site:http://marketing http://customersupport/
Site and URL are the Managed Properties used in Search.
The filtering Search results based on the web sites and sub sites can be done thru OOB search itself by giving the filter site keyword (Note: site is a Managed property). SharePoint allows searching content based on one or more managed property. If the search keyword is “Test”, we need to append the web site URL along with the search keyword in the OOB Search Web part to get the results Test site: http://servername/US. OOB web part provides this functionality and the site filter is appended along with the Search keyword.
Otherwise, the url is given like this http://servername/SearchCenter/Pages/results.aspx?k=Test.
In the above URL, key word and site are used to filter the results.
Where http://servername/SearchCenter/Pages/results.aspx is the Search results page
Mapping Crawled Properties to Managed Properties
To make a crawled property available for the Search experience—to make it available for Search queries and display it in Advanced Search and search results—you must map it to a managed property. You can map multiple crawled properties to a single managed property or map a single crawled property to multiple managed properties. If a managed property has multiple crawled properties mapped to it, and a document contains values for more than one of the crawled properties, the order in which the properties are mapped and their priority determine the managed property’s value.
Multiple Property Filters in Enterprise Search
Enterprise Search in Microsoft Office SharePoint Server 2007 keyword syntax supports the use of multiple property filters within the same query. You can use either multiple instances of the same property filter or different property filters.
Using the Same Property Filter
In this scenario, the keyword query is based on a union of the property filters. This is equivalent to the OR operator used in SQL search syntax.
For example, if you specify the following property filters for a keyword query, both the http://marketing/and http://customersupport/ sites are included in the search:
site:http://marketing/ site:http://customersupport/
Using Different Property Filters
In this scenario, the keyword query is based on an intersection of the property filters. This is equivalent to the AND operator used in SQL search syntax.
For example, if you specify the following property filters for a keyword query, all content authored by John Smith from the http://marketing site is included in the search:
site:http://marketing/ author:"John Smith"
SQL Syntax Examples
Search in Windows SharePoint Services provides support for constructing complex search queries through the SQL syntax. Some examples of what is available when using SQL syntax for search queries include the following:
· Comparison operators, such as ">", "<", or · Multiple logical operators, such as AND, OR, and NOT.
1. Finds relevant results containing the keyword SharePoint.
SELECT WorkId,Path,Title,Write,Author,HitHighlightedSummary, HitHighlightedProperties,CollapsingStatusFROM Scope()WHERE FREETEXT(defaultproperties, 'SharePoint') ORDER BY Rank Desc
2. Finds relevant results containing at least one of the keywords SharePoint and Search. SELECT WorkId,Path,Title,Write,Author,...FROM Scope()WHERE FREETEXT(defaultproperties, 'SharePoint Search') ORDER BY Rank Desc
3. Finds relevant results containing both the keywords SharePoint and Search.
SELECT WorkId,Path,Title,Write,Author,...FROM Scope()WHERE FREETEXT(defaultproperties, '+SharePoint +Search') ORDER BY Rank Desc
4. Finds relevant results containing the exact phrase SharePoint Search.
SELECT WorkId,Path,Title,Write,Author,...FROM Scope()WHERE FREETEXT(defaultproperties, ' "SharePoint Search" ') ORDER BY Rank Desc
5. Finds relevant results containing both the keywords SharePoint and Search but not the keyword WSS.
SELECT WorkId,Path,Title,Write,Author,...FROM Scope()WHERE FREETEXT(defaultproperties, '+SharePoint +Search -WSS') ORDER BY Rank Desc
6. Finds relevant SharePoint results authored by persons named John.
SELECT WorkId,Path,Title,Write,Author,...FROM Scope()WHERE FREETEXT(defaultproperties, 'SharePoint') AND CONTAINS(Author,' "John" ')ORDER BY Rank Desc
7. Finds relevant SharePoint results modified within the last 30 days. SELECT WorkId,Path,Title,Write,Author,...FROM Scope()WHERE FREETEXT(defaultproperties, 'SharePoint') AND Write<=DATEADD(DAY,30,GETGMTDATE())ORDER BY Rank Desc.
Configuring sharePoint Search step by step is available here
Customizing core results web part is avaialble here
Configuring Audiences in Sharepoint Central administration SSP
· Create audience in Central Admin SSP (Shared service Provider)
· Create Rules based on user account or profile.
· Compile Audience group
Once the audience is compiled, then the profiles are loaded into the audience group and we can have any number of rules.
Pre-Requsities to create Audience
1. A SSP(shared service provider) must be created
2. User must have administrative previleges
Adding Custom user Control in SharePoint Page
User Control can be added to SharePoint master file or it can be embedded in a web part. The steps for attaching a user control in SharePoint are described below.
Step1:
Create a user control (*.ascx) file.
Step2:
Put the ascx in C:\Inetpub\wwwroot\wss\VirtualDirectories\1111\USerControls\
Where USerControls is a custom created folder in virtual directory.
Step3:
Copy the usercontrol dll in GAC
Step4:
Edit the web config file as below
Add the usercontrols folder as safe controls
<
SafeControl src="~/userControls/*" includesubfolders="True" safe="True" allowremotedesigner="True">
Add the user controls dll as safe controls
<
SafeControl assembly="usercontrol, Version=1.0.0.0, Culture=neutral, PublicKeyToken=cb1dc3b73b79f0d0" namespace="usercontrol" typename="*" safe="True">
Subscribe to:
Comments (Atom)